The Sift Science Console’s Javascript Loading Strategy
A few years ago, the advice for keeping your page fast was to keep your page weight down. These days, however, we know that it’s not necessarily how big your page is, it’s how, when, and if you send it content; a 5MB page and a 200kB page could have the same First Meaningful Paints and Times To Interactive. In this post, I’ll highlight our strategy for performantly loading the Sift Science single-page console application. (Note: you may find it easier to digest if you have some familiarity with webpack.)
Something important to keep in mind is that while there are certainly best practices, there aren’t necessarily any right answers; the best thing you can do is identify and weigh tradeoffs specific to your application. For our case, here are a few constraints to keep in mind:
- This is a desktop-only app (used by companies’ fraud analyst teams)
- We only need to support modern browsers (but not modern enough to be able to, say, ship native ES6 modules)
- The app employs fairly strict CSP headers that ban all inline scripting
This means that we can ship ES6 code, and we don’t have to fret too much about whether our webpack-powered javascript chunks all fit within a 30kB threshold. But it also means that all of our javascript must come from over the wire, and we can’t embed even small scripts into the html to avoid an extra request here and there.
The Single Page App’s Single Page
Our app’s html file is really simple. In fact, I’ve included an exact screenshot of the pre-compiled pug file below (with pink dots highlighting our scripts):
The first thing you might notice is that we have a lot of blocking (non-async) scripts. For a javascript-powered single-page app (SPA), this is okay! Blocking scripts are generally considered bad because the HTML parser stops until the script is fetched and executed. But without javascript, nothing can render on our page, anyway, so by using blocking scripts we can at least guarantee their order of execution. All that matters is that the scripts lie below our svg loader GIF, which will ensure that by the time the HTML parser pauses, the loader has also already rendered.
Speaking of the loader GIF, we’ve also inlined some CSS animations nested within the <svg> so that we can see it move without having to wait for our main CSS file to download:
 The Sift Science Console loader GIF
And speaking of inlining, we’ve inlined the <svg> content itself instead of using an <img> tag so that the loader doesn’t need to be fetched—it can render immediately after the HTML is parsed!
Okay, okay, these aren’t javascript strategies. Back to javascript strategies.
Our Blocking Scripts
The first script we run into is one called performanceObserver, which is a very small, no-dependency script we use with the PerformanceObserver API to measure how long it takes our users to download static resources. These resources include our top-level and async javascript chunk files, the CSS file, and fonts, so the script must be run before all of them are requested. This is why it’s even above the CSS file.
Let’s now skip all the way down to the last javascript file requested in the page, console.js. This is our entry file. It contains core app logic that is generally common across all routes, and it uses webpack’s runtime to dynamically request additional route-based javascript chunks via code splitting. On every page load, before we can render the app, we always have to download both console.js and the javascript chunk for the current page. Furthermore, the chunk normally won’t even get requested until console.js is downloaded and executed—more on that in a bit.
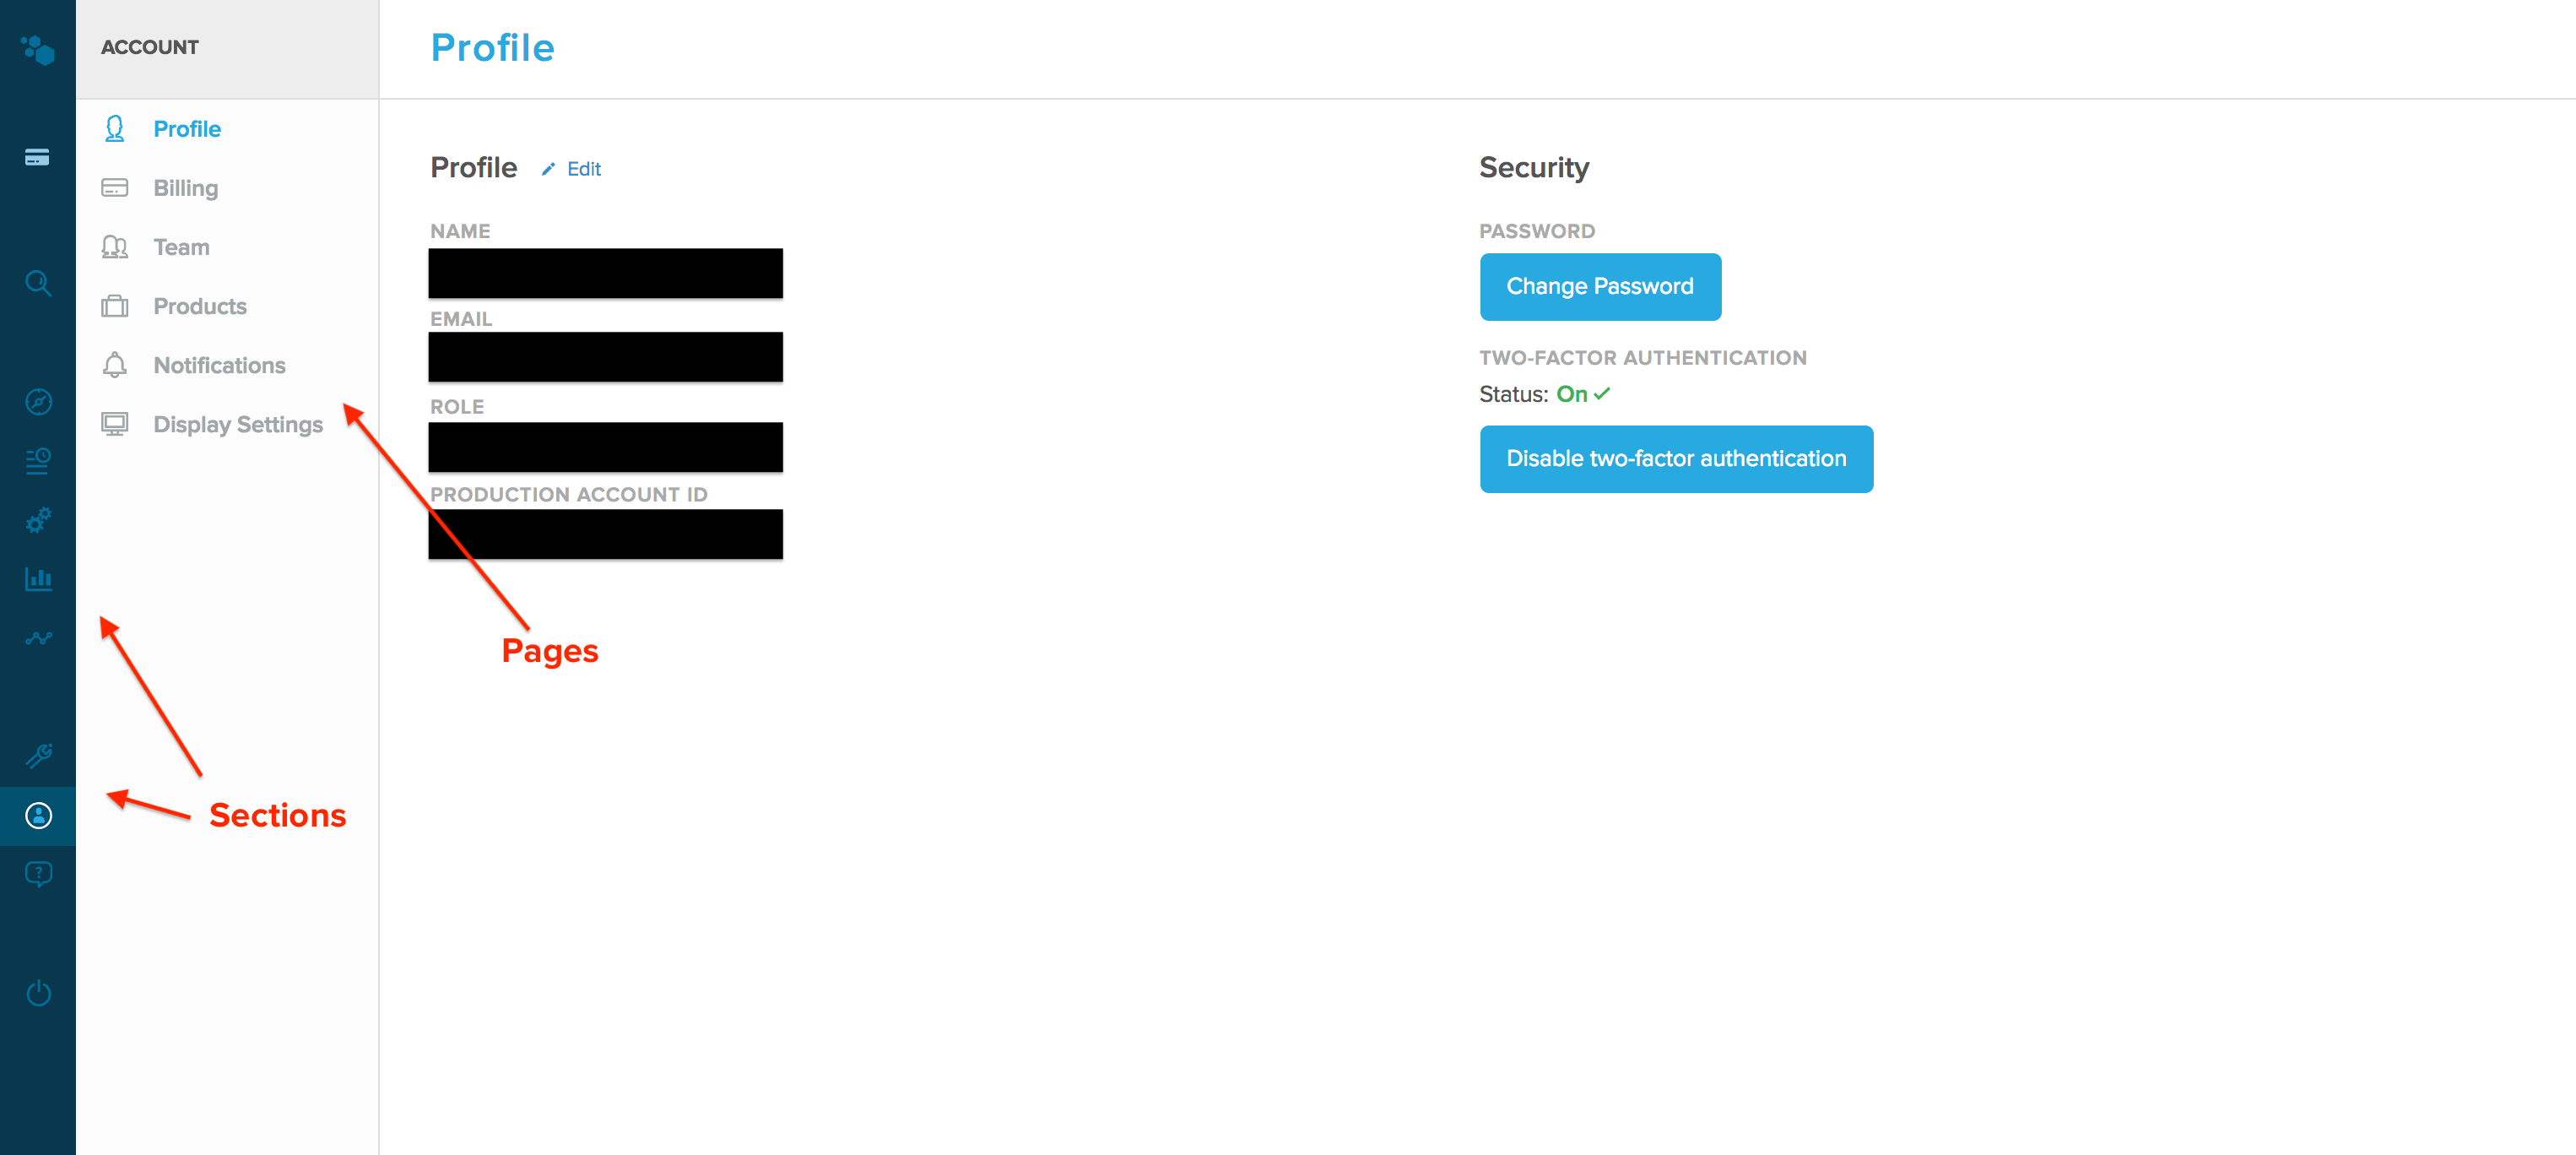
By the way, when I say our chunks are route-based, that’s only half-true. In the Sift Console, we have a notion of a Section, which is comprised of multiple related Pages. For example, the Account Section might include the Billing Page, the Profile Page, and the Display Settings Page (among others, as shown below).
 The Sift Science Console groups javascript splits by Section, which is a collection of Pages, as opposed to by Pages themselves.
Because many of the pages have a low marginal javascript weight, we use section-based chunks instead of route-based chunks. This way, when you visit the Billing Page, you download account-<hash>.js instead of billing-<hash>.js, and when you then click on the Profile Page, you download nothing—you already have everything you need. The tradeoff, of course, is that the size of account-<hash>.js will be greater than billing-<hash>.js alone, and we’ve just front-loaded that weight. But since our app is a desktop app accessed over wifi, we determined that we’re okay with that tradeoff in exchange for making the user only wait once. (Side note: this looks super promising!) We do have a few pages that are notably larger than the rest, and those get their own route-based chunks.
You may have noticed that I’ve been writing out the chunk names with the -<hash> placeholder. These hashes, used for caching and based on a file’s contents, are normally included as part of the webpack runtime so that webpack knows what filename to request; the runtime itself gets automatically prepended to every entry file. Unfortunately, that means that every time any of our chunks change (and thus their hashes), the hash for their parent (console.js) also changes because of the hashes kept within the runtime!
To get around this, we utilized this awesome plugin from SoundCloud that extracts the hashes out of the runtime and into a JSON file. Alternatively, using the inlineManifest: true option will assign them to a global variable in an inline <script> tag for use in an html template. However, neither of these approaches actually works for us, because while we need to assign the JSON to a global variable, we can’t use inline scripts. So we forked the repo and hacked together our own version that writes to a .js file, where the JSON is assigned to the global. That’s the purpose of the chunkManifest.js file you see in the index.html screenshot.
 Our custom fork of SoundCloud’s ChunkManifestWebpackPlugin outputs a js file that assigns the chunk names (with their current hashes) to a global variable that the webpack runtime looks for.
Let’s take a look now at our vendor.js file, placed at the top-level, just above our entry file.
Webpack 2 → Webpack 4
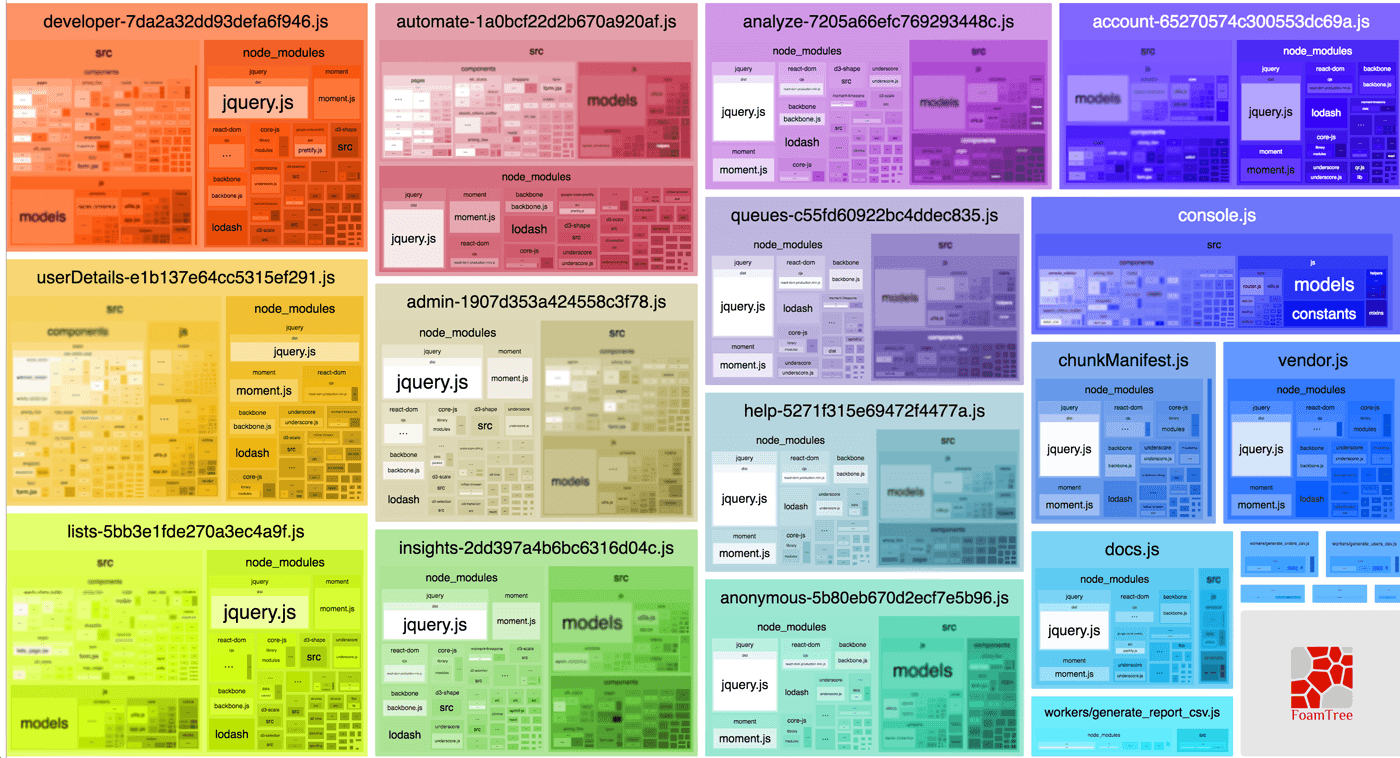
We recently upgraded our Webpack version with fantastic results. It turns out that all of your pre-defined Webpack 2 code chunks are by default self-contained, meaning they each bundle all modules they import. This led to a lot of duplication—we were splitting out our vendor chunk via CommonsChunkPlugin, but that only extracted vendor files out of our console.js entry point—all of our chunks each had their own vendor modules!
 A visual representation of our entry file (console.js) and our async code splits (anything with a hash appended to the name is a split bundle) with Webpack 2. Courtesy of the BundleAnalyzerPlugin.
Notice in this chart how each of the chunks have their own node_modules folder—except for our entry file console.js, from which the vendor.js file was populated. Not only this, but because we couldn’t get reliable “splits of our splits” (a new chunk file comprised of common files among other async chunks), there were also a lot of non-vendor, commonly-used modules bundled into every single chunk. Aside from giving us immense code bloat for our splits, it also caused their hashes to change on most deploys: a change to a shared module for use in the Help Section, for example, would also change the same module for the Lists Page—causing the List Page javascript’s cache to be busted.
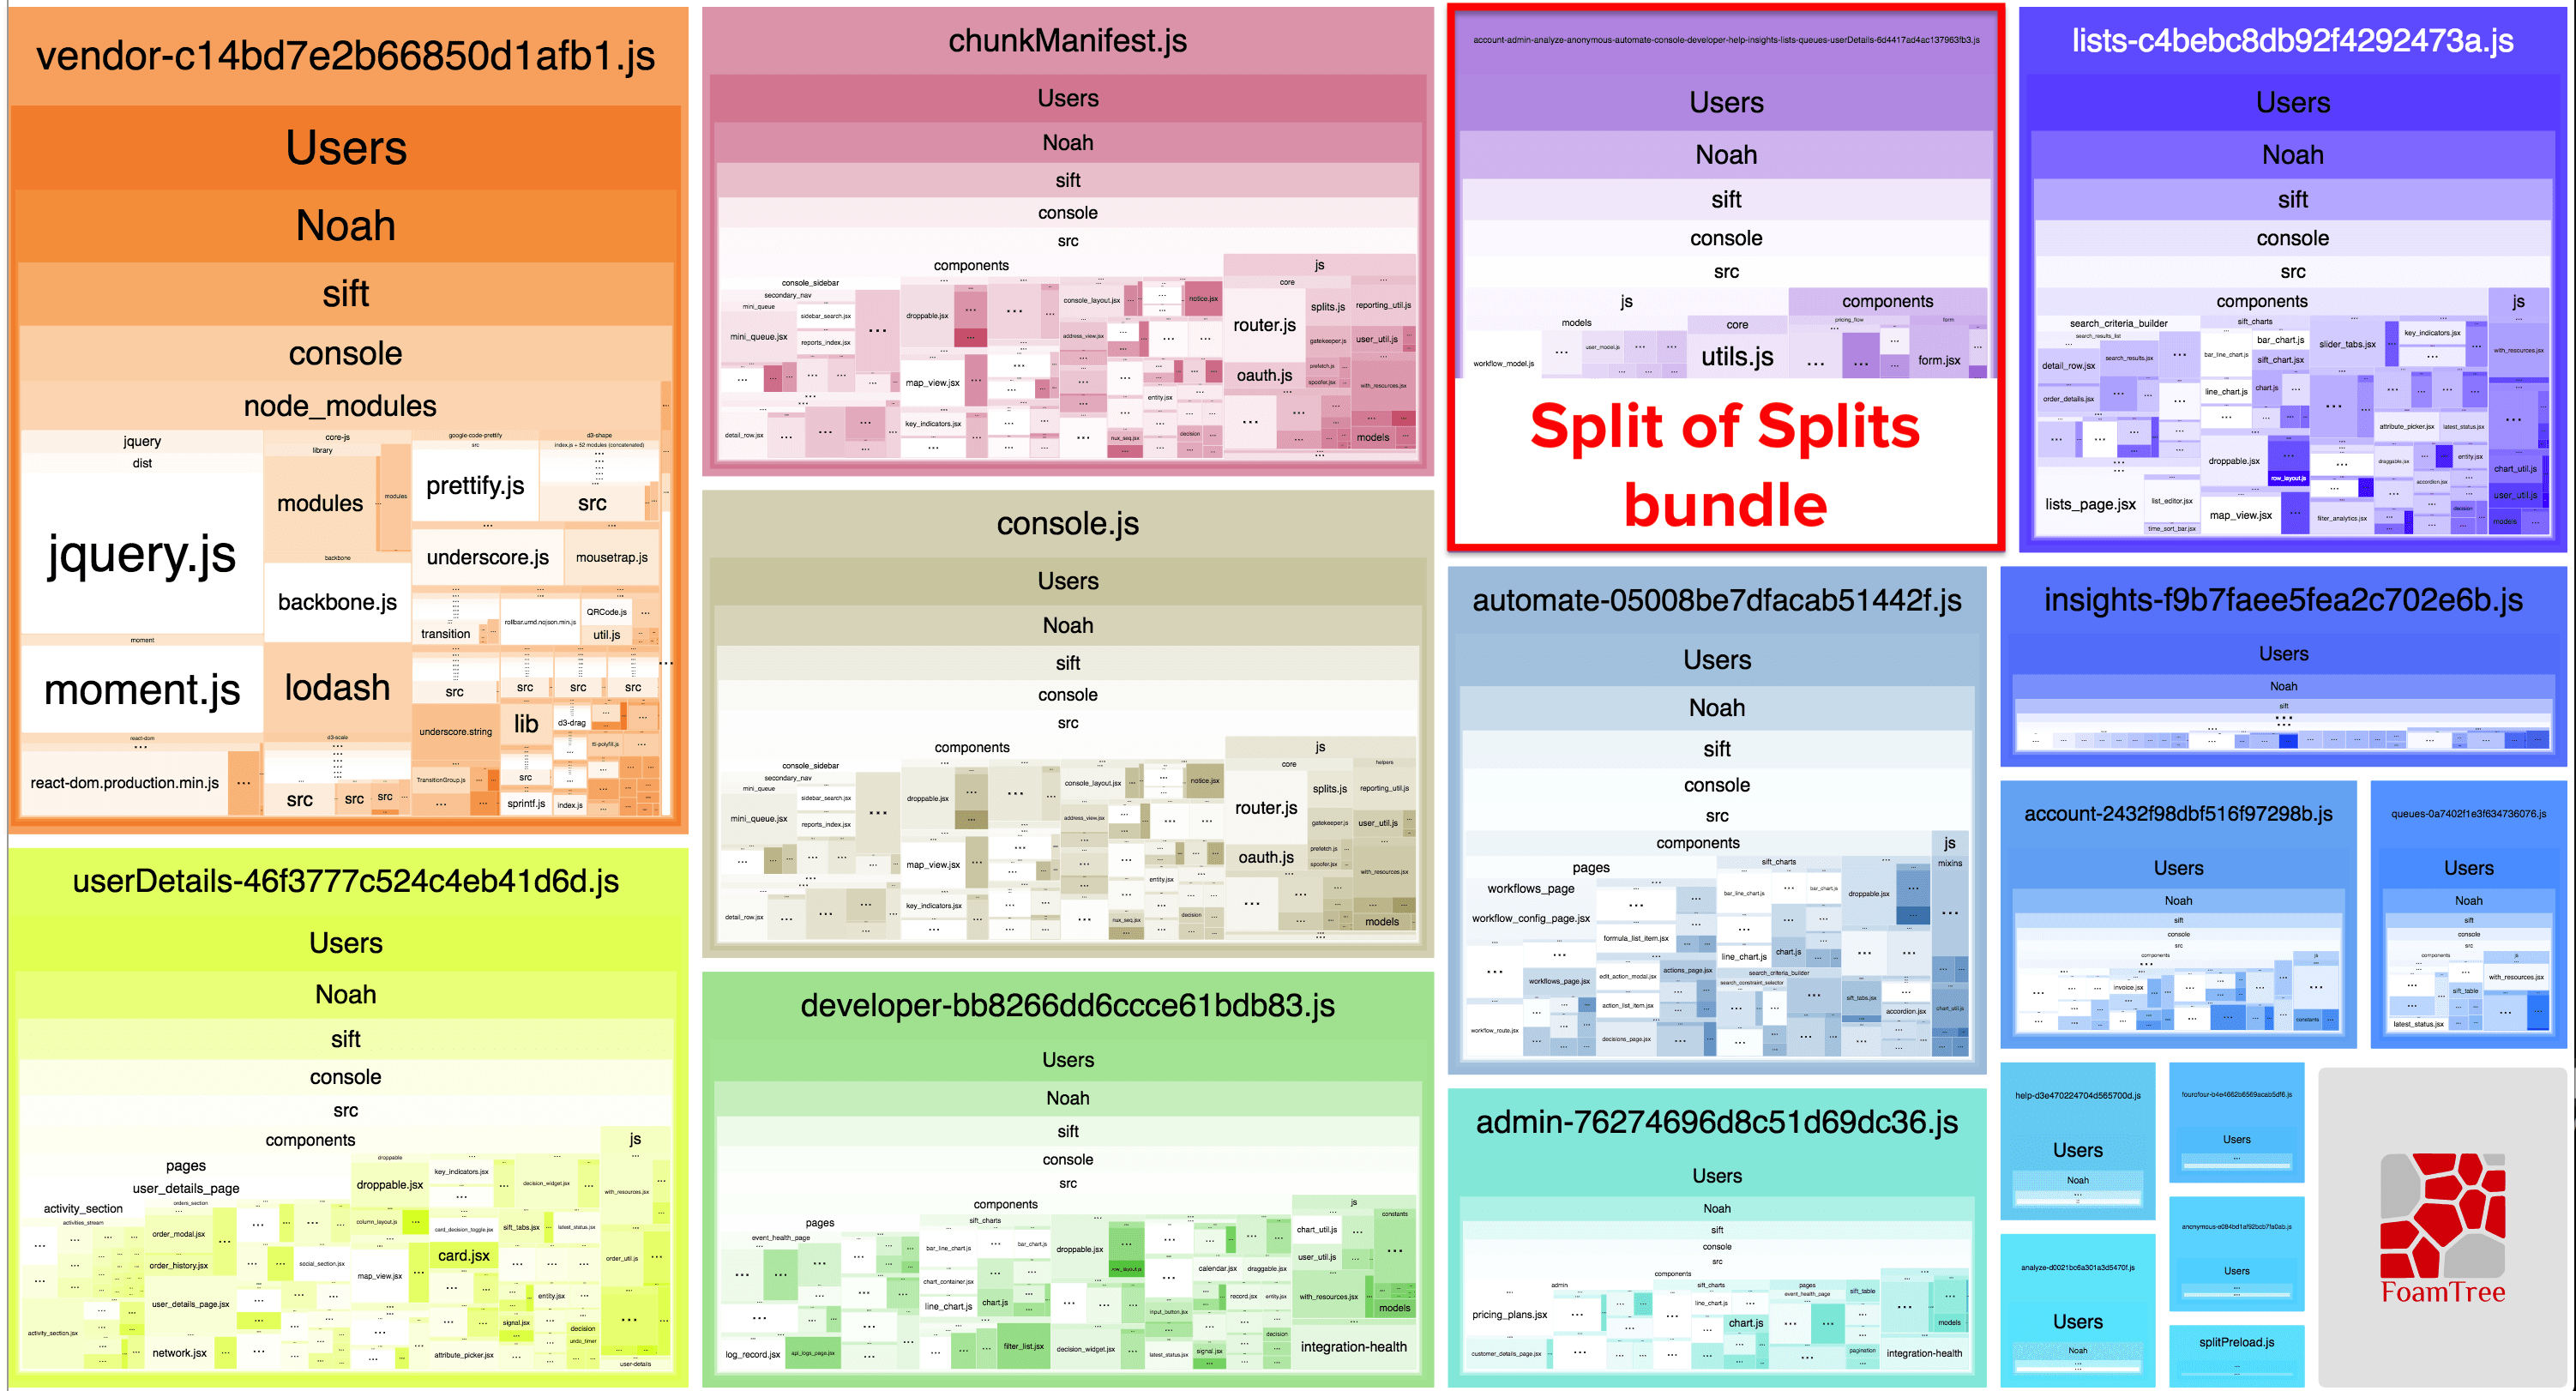
Webpack 4 takes care of this, removing CommonsChunkPlugin in favor of the SplitChunksPlugin, which does do splits of splits:
 Another visual representation of our Webpack bundle, this time using Webpack 4’s SplitChunksPlugin.
Notice how the only bundle that contains our node_modules is our vendor chunk—it’s now taken out of both our entry console.js and all our splits! Furthermore, it created a split of our splits, containing modules common to all the async chunks, further dwindling their file size and their likelihood of getting cache-busted. Some of our chunks went down in size by over 90%!
So now that we have an appropriately-extracted vendor file, we add it as a top-level script in our index.html. Oddly, webpack will name the file as an async chunk, which is why you see it in the above diagram with the -<hash> filename (we hash our top-level javascript files independently of webpack, as you can see in our index.html screenshot). I think this is a bug, since if we’re extracting from our entry file, the resulting file should be a sibling to the entry—which is top-level.
On that note, requesting your vendor file dynamically means that your entry file will have to download and execute before the vendor request gets made. If your vendor file contains libraries critical to your application (for example, React or lodash), this would unnecessarily slow down your time-to-first-paint. As a top-level request, however, you can download it in parallel with your entry file, and take advantage of the browser’s lookahead parser to make a request even before the HTML file has finished parsing. You should really only dynamically request libraries if they’re only pertinent to a small subset of unfrequented pages in your application; otherwise, request it in parallel and know that, because libraries seldom change, it will be in the HTTP cache more often than not.
Preloading our Async Chunks
I mentioned before that a section’s javascript split file won’t get requested until the entry console.js file is downloaded and executed. Well, we came up with a way to preload those splits in parallel, which I wrote about in a blog post a few months back. I won’t repeat its contents here except to say that it is handled within our splitPreload.js file.
By its nature, preloading is opportunistic; if it doesn’t happen, the app will still load successfully. But if it does happen, it will make the app load faster. This is a textbook example of when to use a script as async, which is what we do here, meaning that it won’t block the HTML parser. Its position in the index.html file is important, though—if it weren’t placed above the vendor.js and console.js files, the async file would still get fetched early due to the browser’s lookahead parser, but it wouldn’t get executed until after the blocking files execute. And in that case, we’d still effectively be waiting for console.js to load and execute.
What’s even better is that our splitPreload script will automatically load in parallel all required splits for the current section. This includes our new “split of splits” from Webpack 4, so that all we end up requesting for our other sections is their own split file, which, as discussed, have shrunk significantly in size.
 Network waterfall view for loading the Sift Science Console.
Preloading via rel=preload
In our <head>, we use the new preload spec to preload a script and stylesheet to load in WebGL maps via Mapbox. In their documentation, they recommend adding those assets as blocking assets. But this would be a mistake; if, for whatever reason, Mapbox’s servers become slow to respond, our console would become slow to load. So we load it async, but we load it async from a module inside our entry console.js. Using rel=preload just means that by the time console.js adds the assets to the page, they’ve already been requested and have likely already returned. If you have to support browsers that don’t support rel=preload, loading these scripts with an async attribute in index.html (and outside of the entry file) would suffice, as well.
Server-side Rendering (SSR)
As you can probably tell from our index.html file, we don’t use server-side rendering. There are a lot of use-cases where SSR is beneficial, but it really requires you to have a page that can be interactive without javascript: maybe there are some hyperlinks a user can click on, maybe the page is a text-heavy wiki, or maybe it’s a product detail page where you can display several images via <img > tags and some styles.
But this is not the case for us. If, instead of the index.html that we displayed above, we returned the compiled html for the current route, we would hit the dreaded uncanny valley, where the page renders and looks nice, but is completely non-functional until the javascript returns, anyway—the dropdowns won’t work, additional api ajax requests can’t be made, click events aren’t listened to, etc. This would likely be a frustrating experience with a high First Input Delay, and so SSR was not a path we decided to go down. It’s much more important to us to deliver interactive content as fast as possible.
 When a server-side-rendered page gets painted to screen long before the javascript returns, an “Uncanny Valley” occurs, where the site looks interactive but is not. Image created by Paul Lewis.
BONUS: CSS and Font Loading Strategies
Just for kicks, let’s round out the rest of our index.html.
We have a single blocking CSS file that contains all of our styles, and, when gzipped, is still pretty small. Because of this, it’s rarely, if ever, the limiting factor to the critical rendering path (since we have to wait for render-dependent api requests, anyway, which are made after the entry file returns and executes). However, it does get cache-busted every time we change anything. One thing we may do in the future is split up our CSS similar to how we’ve split up our javascript, fetching at once a section’s javascript and CSS. For now, though, the important thing is that the CSS <link> tag is placed after our loader in the html (yes, in the <body>!), so that the loader is already rendered by the time the page puts rendering on pause while the styles are fetched.
Finally, you may have noticed that we also are preloading a couple of our most commonly-used fonts. This is to avoid any FOUC, since otherwise fonts are not loaded until there’s a matching CSS rule on the page that requires it. That means that without preloading, our main fonts don’t get requested until after all CSS is loaded and parsed and our entry javascript file, commons file, and route-based chunk (all necessary to render the page) get downloaded and executed. At that point, it’s hard to avoid any FOUC. Of course, fonts are typically cached for a long time (ours are cached for a year), but http caching is a bit fickle, since the browser will empty it whenever it gets full—not necessarily when the cache time runs out.
 Close-up of network waterfall, highlighted preloaded requests, which are automatically prioritized over other top-level assets. Browsers assign preload priority for you, but it’d be nice to be able to override them, since none of the four preload requests really need to come before the top-level scripts.
If, for some reason, the font request takes a very long time, we backup the preload with a font-display: swap; rule for those browsers that support it—to at least, if we can’t avoid the FOUC, avoid any FOIT.
Conclusion
We hear a lot about new specs or new tools put in place to help improve user experience, and I hope this write-up is a useful and comprehensive example of how several of them can be tied together. There’s more we can do, too, like employing service workers to have finer-grained control of the javascript in our cache, or using a CDN for faster and more consistent download times. As I mentioned, while there are best practices, “the right answer” is subjective and depends on your use-case and your users. You’ll want to list out your own constraints and determine which tradeoffs are worth making. And don’t forget to measure as you go, to make sure that you’re making things better!
Did I miss anything? Disagree with anything? Don’t hesitate to let me know!
Love front-end performance? We love you. Come fight fraud with us!
